Android - Studio for beginners
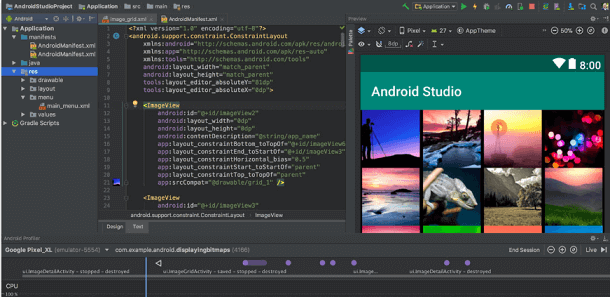
Android Studio is the official Integrated Development Environment (IDE) for android application development. Android Studio provides more features that enhance our productivity while building Android apps.
Android Studio was announced on 16th May 2013 at the Google I/O conference as an official IDE for Android app development. It started its early access preview from version 0.1 in May 2013. The first stable built version was released in December 2014, starts from version 1.0.
Since 7th May 2019, Kotlin is Google's preferred language for Android application development. Besides this, other programming languages are supported by Android Studio.

Features of Android Studio
- It has a flexible Gradle-based build system.
- It has a fast and feature-rich emulator for app testing.
- Android Studio has a consolidated environment where we can develop for all Android devices.
- Apply changes to the resource code of our running app without restarting the app.
- Android Studio provides extensive testing tools and frameworks.
- It supports C++ and NDK.
- It provides build-in supports for Google Cloud Platform. It makes it easy to integrate Google Cloud Messaging and App Engine.
Android Studio Version History
| Version | Release date |
|---|---|
| 1.0 | December 2014 |
| 1.1 | February 2015 |
| 1.2 | April 2015 |
| 1.3 | July 2015 |
| 1.4 | September 2015 |
| 1.5 | November 2015 |
| 2.0 | April 2016 |
| 2.1 | April 2016 |
| 2.2 | September 2016 |
| 2.3 | March 2017 |
| 3.0 | October 2017 |
| 3.1 | March 2018 |
| 3.2 | September 2018 |
| 3.3 | January 2019 |
| 3.4 | April 2019 |
| 3.5 | August 2019 |
Android Studio Project Structure
The Android Studio project contains one or more modules with resource files and source code files. These include different types of modules-
- Android app modules
- Library modules
- Google App Engine modules

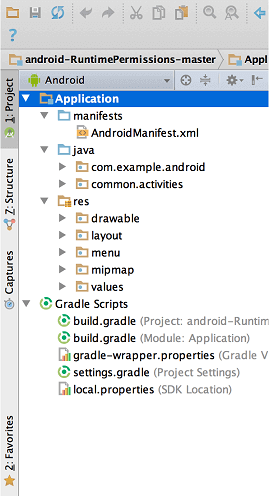
By default, Android Studio displays our project files in the Android project view, as shown in the above image. This view is formed by modules to provide quick access to our project's key source files.
These build files are visible to the top-level under Gradle Scripts. And the app module contains the following folders:
- manifests: It contains the AndroidManifest.xml file.
- java: It contains the source code of Java files, including the JUnit test code.
- res: It contains all non-code resources, UI strings, XML layouts, and bitmap images.
We will see the actual file structure of the project by selecting the Project from the Project dropdown.
Android Studio User Interface
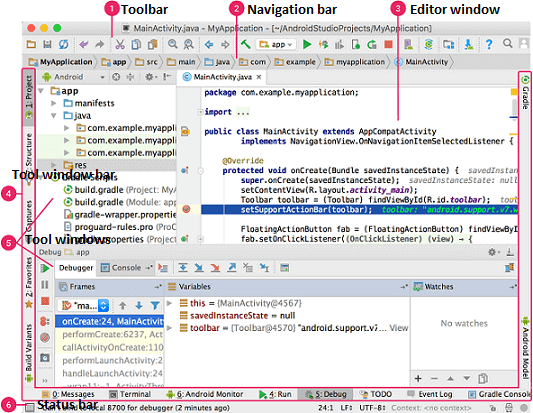
The Android Studio main window contains the several logical areas which are shown in the below figure:

- The toolbar provides us a wide range of actions, which includes running apps and launching Android tools.
- The navigation bar helps in navigating our project and open files for editing. It gives a compact view of structure visible in the Project window.
- The editor window is a space where we can create and modify our code. On the basis of the current file type, the editor can change. While viewing a layout file, the editor displays the Layout Editor.
- The tool window bar runs around the outside the IDE window and contains buttons that allow as to expand and collapse individual tool windows.
- The tool windows provide us access specific tasks like search, project management, version control, and more. We can able expand and collapse them.
- The status bar displays the status of our project and IDE itself, as well as any messages or warnings.
We are willing to organize the main window to give ourselves more screen space by moving or hiding toolbars and tool windows. We can also use keyboard shortcuts to access most of the IDE features.
Android Studio Tool window
We can use keyboard shortcuts to open tool windows. The below table provides the list of shortcuts for the most common windows.
| Tool window | Windows and Linux | Mac |
|---|---|---|
| Project | Alt+1 | Command+1 |
| Version Control | Alt+9 | Command+9 |
| Run | Shift+F10 | Control+R |
| Debug | Shift+F9 | Control+D |
| Logcat | Alt+6 | Command+6 |
| Return to Editor | Esc | Esc |
| Hide all Tool Windows | Control+Shift+F12 | Command+Shift+F12 |
For more information click here..


No comments: